
Guide to Using DDRescue to Recover Data
This guide was written by one of our forum members SilverLeaf and was originally written as a forum post. This guide is intended for people who are looking to do quality data recovery using free tools. This guide is fairly technical requiring you to deal with the Linux command line. Some paid software is more straight forward than the steps here, but this is a great way to get the job done for free. Use at you own risk. Technibble and SilverLeaf take no responsibility for the loss of any data, business, reputation etc..
It seems that a guide for using ddrescue might be of some benefit to many members who may be shy of the linux terminal. So, I’ve decided to document some real-world examples from in the shop. I plan on doing this in 3 parts to cover the most common scenarios.
Part 1: Creating an image from a failing disk
Part 2: Restoring an image to a new disk & cloning directly to a new disk
Part 3: Working with the image files
In will be using Parted Magic as a platform for this guide. I usually PXE boot (or boot from a live CD) the machine that I am working on to Parted Magic for this purpose. If you run linux on your test bench machine and prefer to attach the failing drives to it, this guide will give you the basics, but obviously the screenshots will be different.
Part 1 – Creating an Image from a Failing Disk
Firstly, a refresher on how unix/linux names block devices (hard drives, usb drives, cdroms, etc). These devices are represented as files within the /dev directory. Hard drives are usually denoted with the “sd” prefix, followed by an incremental alphabetical designation, beginning with “a”. So, the first recognized device will be /dev/sda, the second will be /dev/sdb and so on. Furthermore, the partitions on a particular drive are represented by incremental numbers. For instance, /dev/sda1 is the first partition on the first hardrive, /dev/sda2 the second partition on the first drive, and so on.
For our purposes, this is relevant because we may want to image the complete drive (say /dev/sda), which includes everything (MBR, partition table, all partitions). Or, we may just need to image a single partition (say /dev/sda2). If you just need to recover files from a Windows partition, it is advisable to only image that particular partition (as opposed to the entire disk). If, on the other hand, you intend to rescue the whole drive, replace the failing drive, and re-image; then certainly image the whole drive so you get the MBR, etc.
If you want to see a list of the block devices currently attached to your system, run this command:
# lsblk -o name,label,size,fstype,model
In Parted magic, you will get something like this (from my guinea pig laptop)
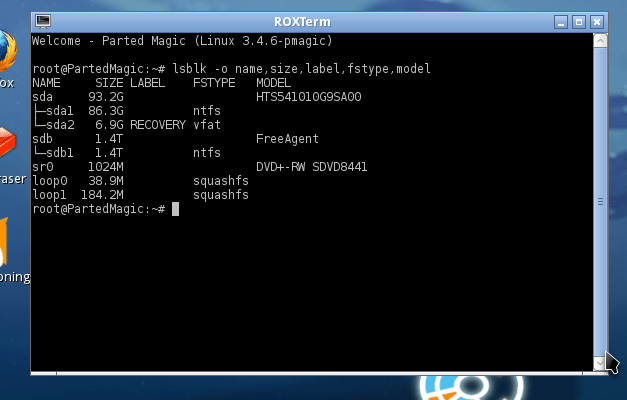
As you can see, there are two hard disks attached:
- /dev/sda, which contains two partitions: /dev/sda1 and /dev/sda2. This is the Windows8 drive installed in the laptop.
- /dev/sdb, which is my attached USB drive and contains a single partition: /dev/sdb1
At this point you will want to make note of the name of the drive or partition that you want to rescue, and the name of the drive where you want to store the image. Be aware, that if you have multiple drives installed, it is possible that these designations can change after a reboot; so be sure to double check before you proceed.
In this example, we are going to image the whole Windows8 drive in the laptop to an image file stored on the attached USB hard drive.
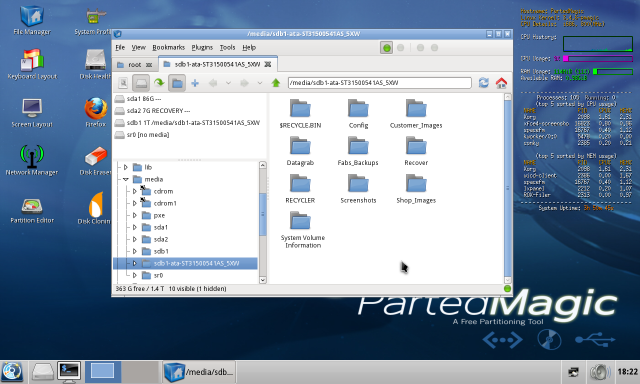
The first thing to do is to open the “File Manager” from the Parted Magic desktop and browse (and/or create) the directory on your USB drive that you intend to store the image and the logfile on. In this example, I will be storing the image in the root directory of the USB drive. Note: Do not mount/browse the drive you are trying to rescue. Make sure the drive you plan to store the image on has sufficient capacity. If you are rescuing a 500gb drive, you must have at least 500gb free to store the image.
Make sure you are located in the directory where you intend to store the image in File Manager and select “File->Terminal”, and a new terminal window should open with the directory you have chosen as the working directory.
The syntax for the command we are going to use is:
# ddrescue -d -r3 /dev/sda test.img test.logfile
Here’s what this does:
- d tells ddrescue to use direct disk access and ignore the kernel’s cache
- -r3 tells ddrescue to retry bad sectors 3 times before giving up. Note: On a failing drive you may want to eliminate this option the first time so as to not waste time hammering on bad sectors and risking drive failure. You can always use the logfile to go back and retry the bad sectors after you get an image from the first sweep.
- /dev/sda is the drive we are rescuing…the whole disk. Naturally, if you just wanted a specific partition, you would use something like /dev/sda1 instead.
- test.img is the name of the image file
- test.logfile is the name of the logfile. Always use a logfile. This allows you to resume an interrupted image at the point you left off, or to retry bad sectors after an initial pass. Without a logfile, you will have to start over again!
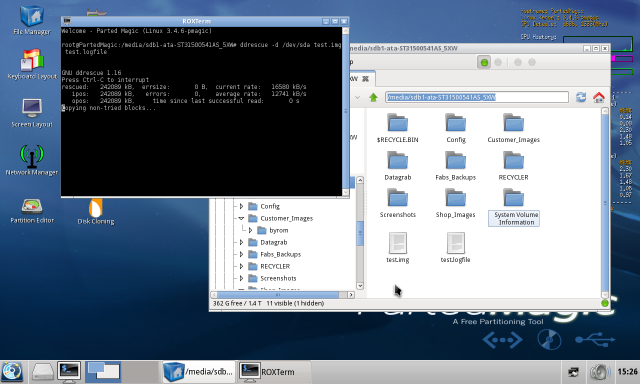
Notice the appearance of the new files in the File Manager pane (test.img and test.logfile). This process will take a good while. It’s not uncommon for a large drive with lots of damage to take days to complete.
Part 2 – Restoring an image to a new disk
Let’s assume now that our image from Part 1 is complete. If our intention is to replace a defective drive and restore the image, then obviously the next step is to install the new drive. A word of caution here: the new drive must be at least as large as the original. If ddrescue runs out of space, it will fail at the very end, even if it is only a few bytes shy. I prefer a drive that is larger, just in case. Drives of the same nominal size can differ enough between makes and models to cause problems….I’ve learned this the hard way.
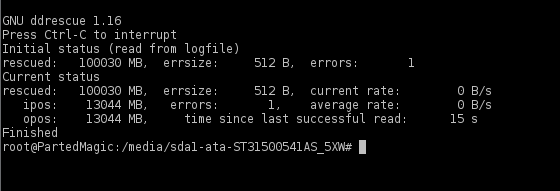
Another consideration is the integrity of the image file. When ddrescue has done all it can, you may still have a significant amount of errors. The terminal window that you started the rescue process in will display the number and size of the errors when ddrescue has finished running. If there are any, it is possible that the damage could be enough to render Windows unstable when cloned to a new drive, depending on where the damage is.
Sometimes running CHKDSK and SFC on the new drive afterwards will take care of it, sometimes not. It’s a judgment call at this point. If the errors are significant, you may be better off proceeding with a fresh Windows install and a data transfer/recovery from the rescued image (see Part 3). As you can see in this screenshot, ddrescue failed to recover 512 bytes. Depending on which file, if any, this 512 bytes is from, this may, or may not be a problem.
So, assuming everything is OK, install the new drive, connect the USB drive containing the image file, and boot up Parted Magic again. Browse to the image file on your USB drive and open a terminal (File->Terminal). Now, we have a few options on how to image the new drive. I usually use the *nix dd command. dd is very similar to ddrescue, Here is the command:
# dd if=test.img of=/dev/sda
In this case, “if” is the input file (our image file of the entire old drive in this case), and “of” represents the output file (the entire new hard drive). Again, be sure to triple check your device names, especially if you have rebooted. They may be different now.
This will take a while, and dd doesn’t really provide any progress info, so be patient. When the process is finished, reboot and you should be good to go.
You can also use ddrescue to image to the new drive instead of dd if you prefer:
# ddrescue -f test.img /dev/sda restore.logfile
Here, the -f switch is necessary because you are outputting to a block device instead of a file as we did in Part 1. Also be sure to use a different name for the logfile. You don’t want to reuse the old one by mistake. Furthermore, do not use the -d switch that we used earlier. This option is only applicable when the source is a block device, not a file.
Cloning directly to a new disk
Now, knowing what we do about ddrescue so far, it is entirely possible to rescue directly from one drive to another, rather than to an image file. Again, be sure to make sure the new drive is an appropriate size as mentioned earlier. Both drives must be connected to the machine that is running linux, either natively or from a live environment like Parted Magic.
Using the command from Part 1 to view the attached block devices, determine the correct names for the drive to be rescued and the drive to be imaged to. Be careful here. If you get this wrong, you could easily image the wrong device to the wrong device, and have a real problem on your hands. Again, the command is:
# lsblk -o name,label,size,fstype,model
Now, assuming for this example that /dev/sda is the old drive and /dev/sdb is the new drive, we proceed as follows:
ddrescue -d -f -r3 /dev/sda /dev/sdb /media/PNY_usb/rescue.logfile
Note that here we need to use a third drive (flash drive in this case, mounted at /media/PNY_usb) on which to store the logfile (rescue.logfile in this case). You can store the logfile anywhere to which you have write access, just not to either of the two drives involved in the imaging process. And again, the same caveats apply to the -r3 switch as in the example from Part 1.
Finally, a note about resizing partitions after restoring an image to a new drive that is larger than the original. For example: the failing drive that you rescued was 500gb; the new drive that you used is 750gb. After the restore process, you will now have a 750gb drive with 500gb used, and 250gb as unpartitioned space. You have a few options here:
- You could just leave it as-is
- You could take the 250gb of unallocated space and create a new empty partition
- You could choose to resize the existing partitions to include the extra space.
Although outside of the scope of this guide, the tool called gparted (also on the Parted Magic CD, the “Partition Editor” icon), is a great tool for this.
Part 3: Working with image files
Many times we need to use ddrescue to create an image for file recovery purposes, rather than use it to replace a failing disk. Or we discover after the image is finished, that ddrescue reports too much damage to justify attempting to clone it to a new disk and hope that Windows will have enough integrity to operate. So, how do we then use the image files to retrieve the data contained therein?
Actually we have a few options here. Firstly, some file recovery tools will support working with these image files directly, R-studio for example. So, you may be able to point your recovery software to the image file and go to work.
Another option is to mount the image file using linux (either natively or from a live environment like Parted Magic) using the mount command. For a quick primer on mountpoints, please refer to Post# 8 of this thread.
In order to successfully mount the image, we need to know if the image file is a whole disk image (/dev/sda) and/or contains multiple partitions. If the image file is of a single partition (say /dev/sda2), than this process becomes much simpler. This is why I made the earlier statement: “If you just need to recover files from a Windows partition, it is advisable to only image that particular partition (as opposed to the entire disk).”
We will cover this scenario first.
Part 3a: Working with image files containing a single partition
With Parted Magic booted and your image file available (from USB disk, etc), we first need to create a suitable place to mount the image file. Open “File Manager” from the Parted Magic desktop, and browse to the location of your image file, As you can see from the screenshot below, I have an image file named “partition.img” stored on my attached USB hard drive. This is an image file I created of the Windows8 partition only (/dev/sda1, rather that /dev/sda) on my guinea pig laptop.
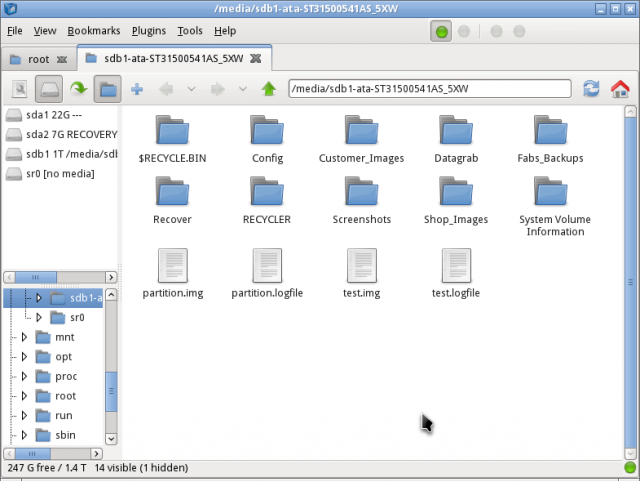
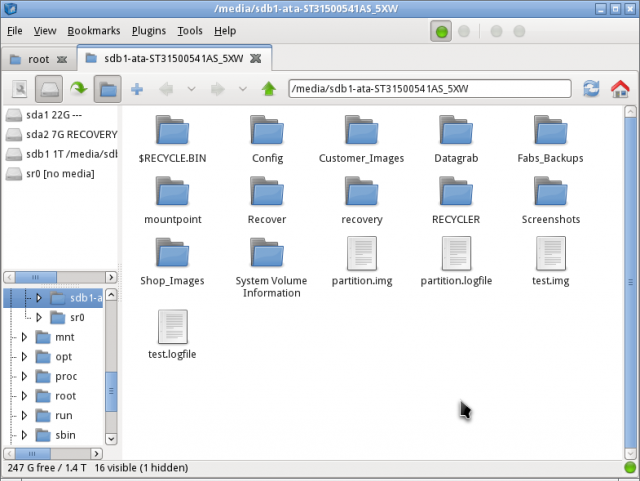
Next I will create two new folders on the USB drive: One named “mountpoint” in which to temporarily mount the image file, and one called “recovery” in which to copy and store the recovered files from the mounted image. Notice the two new folders in the screenshot:
Next, we just need to issue the proper mount command. Again, use File->Terminal to open a new terminal session. Then enter this command:
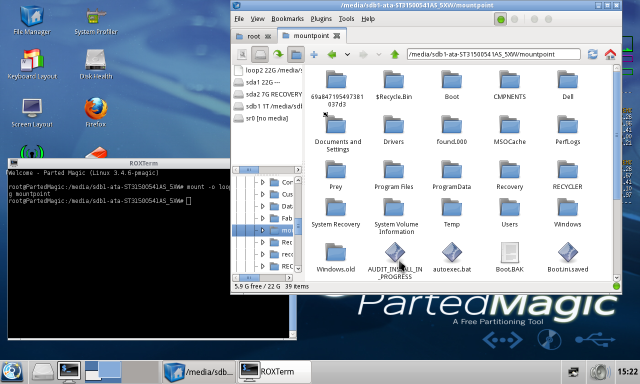
# mount -o loop,ro partition.img mountpoint
This will temporarily mount the image file in the “mountpoint” directory that we created. Note: The “ro” switch mounts the image as read only. You could explicity specify the filesystem type by using the “-t ntfs” switch as well, but the mount command is pretty good at automatically determining this.
Simply browse to that directory, and you should see the contents of the Windows8 partition we rescued.
Now you can simply copy the files you need to the “recovery” directory we created earlier. When finished, simply unmount the image file with this command:
# umount mountpoint
Working with image files containing multiple partitions
Now, if you tried to mount an image file containing a whole disk with multiple partition using the above method, you undoubtedly experienced an error. There is a reason for this. Going back to the “stereo receiver” analogy in post #8 of this thread:
Mount points can be kind of confusing. At the most basic level (ignoring fstab, automounting, etc), when *nix first boots, the only file system it is aware of is the file system contained on the root partition which contains the OS (designated as /). In order to use any other file system (another partition, cdrom, USB drive, floppy, etc), it needs to be attached to a place in the current filesystem that the OS already knows about. This is the mount point. Most often, this is a directory created in /mnt.
It’s kind of like hooking up a stereo receiver. The receiver has input jacks on the back to plug the components into (CD player, cassette deck, turntable, etc.). The receiver cant use any of these components however, until the patch cables are plugged into the corresponding input jacks in the patch panel on the receiver.
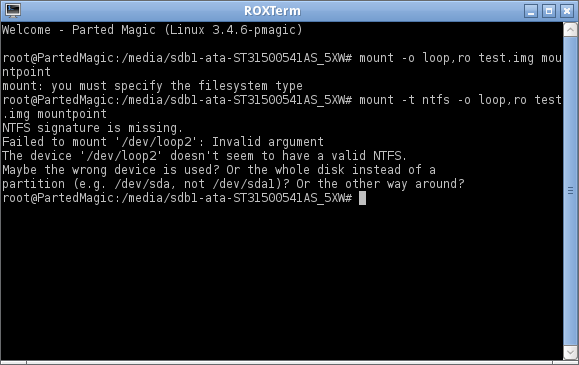
Mounting an image containing multiple partitions is similar to attempting to plug multiple components into the same input jack on the stereo receiver. Here’s what happens when you try this. This screenshot is when I attempted to mount an image file (test.img) that contains multiple partitions:
Fear not, there is still a way to mount the individual partition(s) contained in the image file. What we need to do is to tell the mount command where within the image file it needs to look to find the partition we are interested in. We do this by specifying an offset.
In order to determine the offset of the partition in question, we use a command line tool called parted. Again, using the terminal with your working directory being the one that contains you disk image, type the following command.
# parted test.img
You will then be presented with the parted prompt. At the prompt, type :
unit
then
B
then
and you should be presented with something resembling this:
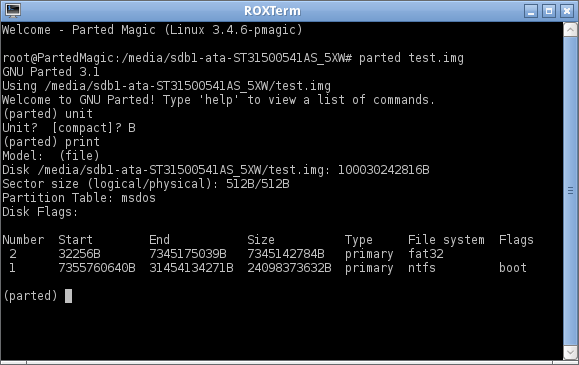
As you can see, this image has two partitions. The first has on offset of 32256, the second 7355760640. As the second partition is the Windows partition in this case, this is the one I’m after. Simply type quit to exit the parted prompt.
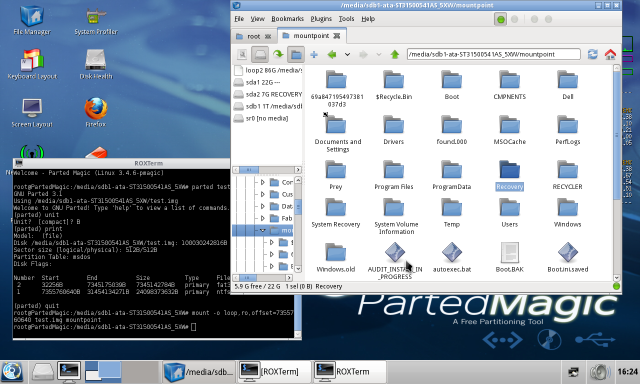
Now that we have the offset, we can try our mount command again.
# mount -o loop,ro,offset=7355760640 test.img mountpoint
There we have it. When I open the “mountpoint” folder where we just mounted the image, I’m presented with the Windows8 partition contained in the full disk image. Now it’s just a matter of copying the files I want to another folder before I unmount the image.
Again, you can see why it is much easier to have recovery software (like R-studio) that can open these whole disk images for you; and why it is easier to mount single partition images (as opposed to whole disk images) for file recovery.
Anyway, that’s the basics. Maybe this will help some to better take advantage of the great tools that are ddrescue and Parted Magic.
Finally, as an aside, I would encourage anyone who finds Parted Magic as useful as I do, to support the developer with a donation. I am not affiliated with the project in any way, but I really believe that it is worthwhile, and would like to see it continue.
Session expired
Please log in again. The login page will open in a new tab. After logging in you can close it and return to this page.
Awesome guide, ddrescue always saves the day but can be kind of a rough start. If I had this when i first started using it i would have had less headaches. Great guide.
I used SilverLeaf’s guide when it was just a thread in the forums. It’s a lifesaver for anyone unfamiliar with DDR or who just doesn’t use it often enough to remember everything. Excellent work SilverLeaf and thanks for sharing!
How timely! I’m just in the throes of learning how to work with ddrescue, and this guide REALLY clarifies things for me. Big thanks!
Thanks for the comments. I’m glad you all found it helpful.
Will the ddrescue and dd commands work with Bitlocker encrypted drives found on windows 8 machines?
I’d imagine so – then you’d likely have to decrypt when done. It’s just 1’s and 0’s whether it’s encrypted or not.
Maybe some of the paid software for making a hard drive image is easier to use, but not as effective as ddrescue. If I did not have a hardware imager, I would not use anything else other than ddrescue(even if someone else bought it)
Maybe some of the paid software for making a hard drive image is easier to use, but not as effective as ddrescue. If I did not have a hardware imager, I would not use anything else other than ddrescue(even if someone else bought it)