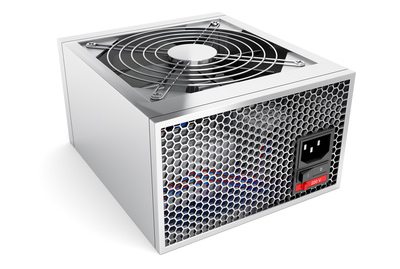
Computer Technicians 103: Knowing your power (supply)
Delivering the juice – connectors
Now it’s time to analyze the different power connectors coming from your motherboard. If you’re the owner of an average computer, built post-2000, you will rarely encounter any other connectors. Despite the fact a few connectors look alike, don’t let temptation take over and don’t connect anything you’re not sure belongs on a piece of hardware – if the difference is as minor as one pin you might not notice it, plug it in, and say bye-bye to your 150 Euro motherboard.
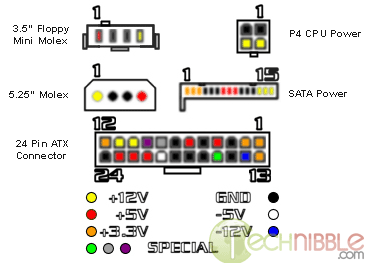
We’ll list the power connectors from left to right, top to bottom – they are displayed as they would be if you were to grab a cable (when the whole computer is unplugged, naturally) and orient it as shown on the schematic, noting the first and last pins of each row. All connectors have protrusions to prevent inserting it the wrong way around – they’re “keyed”. The color coding corresponds to the nature of the pin – volt, GND or signal, and may not coincide with the actual cable color behind it. Observe that high-current connectors have two different connector holes – squares and “houses”.

- 3.5″ Floppy mini-molex – as its name says, it’s primarily used with floppy drives due to their low power consumption, and usually comes as a pair. The leads are +5V, GNDs and +12V
- P4 CPU power – deriving its name from the Pentium 4 CPU, this connector is used to bring extra power to the CPU socket area. This is a standard P4 connector – sometimes there is a mirror version of it on a nearby cable. Since both are keyed, only one can be used easily, the other won’t fit in. The lines are ‘+12Vs and GNDs.
- 5.25″ molex – the big brother of the mini-molex, this easily recognized connector fuels your HDDs and optical drives with juice needed to spin them up. Newer graphical cards or motherboards may need a molex of their own, and quality supplies have dedicated cables for them, usually noted VGA and MBO. They usually come in fours, although some supplies have many more. It shares the leads with its little broter.
- SATA power – this unusually little fellow is a very thin cable, sometimes prone to slipping out of the drive it’s connected to. Delivering +3.3V, +5V and +12V it brings power to your SATA HDDs. If you need an extra molex, an adapter from a SATA to a molex can be bought at a computer supply store for pocket change – and the same goes in reverse.
The Big Daddy of All Connectors
The ATX connector is physically so big it actually asked for its own paragraph, so here we are. This mammoth cable delivers power to the most important component on the chassis – the motherboard. ATX connectors can come in two varieties: the depicted ATX12V+ connector with 24 pins and the old ATX variety, which has 20 pins – they lack pins 11, 12, 23 and 24, but they’re keyed the same, with the plastic tab centered on the connector’s underside. With the 20-pin connector, start counting from pin 1 to 10, skip the next two from the schematic and number the pins from 11 to 20 on the bottom row – the voltages are the same if the colors are. Most ATX motherboards can work with an ATX12V+ connector, provided you can physically fit – not cram – the connector, otherwise you’ll need an adapter. However, an ATX12V+ motherboard absolutely needs the same connector, which means you’ll either have to get a 20-to-24 adapter or (better yet), a new power supply. The most interesting pins on it are the phantom -5V and -12V, and the three special signal pins. The gray pin is called PWR_OK – it’s a signal from the PSU to the motherboard stating the DC voltages are within normal ranges. The purple pin is +5VSB – both a power and a sort-of signal pin which gives the minimum power to a motherboard when it’s shut down (or in standby), yet connected to the outlet. The green pin is called /PS_ON, the definitive oddball among all the lines because it’s a negative logic line – it functions when it’s grounded towards a black pin (i.e. when it is brought to +0 V). It tells the PSU to kickstart itself and turn the computer on the moment you push the button. Usually, it’s the motherboard that grounds it.
Safety in a power generator zone
So, which pins won’t do much harm to you if you accidentally touch them? The answer is very simple, if you value your life, don’t touch any of them. Although touching only one pin isn’t supposed to close a circuit, depending on your footwear and the floor you’re on, you can accidentally ground yourself and have several amperes go through you, doing nasty things such as giving your muscles a warm tingling, a mild shock, a jolt that would stun you for several seconds, or worse. With electricity, it’s current that kills you, but that doesn’t mean you can go around touching that -12V lead – don’t do it. Even 1A may be enough to kill you. The only relatively safe line is the ATX connector’s green 15 and black 16 – the green can be grounded using a paperclip to verify if the power supply’s fan works – but use a pair of insulated tongs to try it, because a short-circuit inside the power supply could drive over 20A through your arm, ending in a way you definitely do not want to imagine. Usually, it’s relatively safe to do, but don’t count on it. All in all, learn not to touch bare wires – if a wire is damaged, unplug the computer and wrap it in black isolation tape to prevent yourself or anyone else from touching it.
The PSU is an important component of the computer, but so are you as the repair technician. So, don’t let yourself touch any pins, and don’t connect pins that don’t belong there. Nothing ruins a day like a zap or a +12V line touching the CPU.
Written by Boris M
Session expired
Please log in again. The login page will open in a new tab. After logging in you can close it and return to this page.

[…] Read more… Tags : how to fix a computer power supply […]