How to Replace a Video Card GPU Fan
Heat is the enemy of computers. Unlike short circuits and lightning strikes, which usually do instantaneous damage to your components, heat is one of the nuisances that can damage your computer over a long period of time, as well. Without delving into water-cooling and similar alternatives, having a well-ventilated, spacious and tidy computer case can help the general airflow. However, sometimes heat has to be directly removed from the overheated component, be it the CPU, the northbridge chipset or the graphic card’s GPU. Those three are commonly considered the three critical overheating points inside a computer.
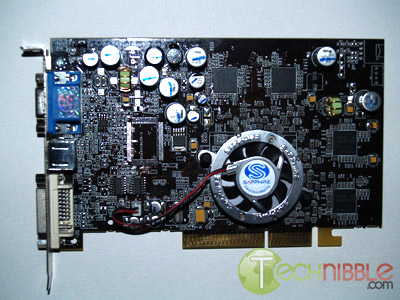
Sometimes, you might have other, reasons for improving cooling. In this sample case, a Sapphire Radeon 9600XT Atlantis developed multiple problems. One of them was the incessant overheating – the idle temperature was around 50 deg. C (122 deg. F), while the active temperature was over 75 deg. C (165 deg. F) – quite a hot coal on our hands. Any temperature exceeding 40 deg. C in idle or 60 deg. C while active is considered risky, because it shows the current heatsink and fan can not extract the heat quickly enough. For comparison, 80 deg. C (176 deg. F) is considered a borderline critical temperature because a process called electromigration starts taking place. Without going into the explanation too much, any higher than that and you’ll get slowdowns and crashing in games, and the chip will start deteriorating faster and faster to its demise.
The second issue with the default fan was that, being made of aluminium, it was relatively easy to dent – in fact, one of the screws did just that, and it was impossible to reassemble it without having the whole fan rattle and whirr. Although a drop of superglue could’ve stopped the rattling, that alone would not have fixed the heat issue, so a replacement was in order. After almost two years of service, one could say a replacement was even mandatory.
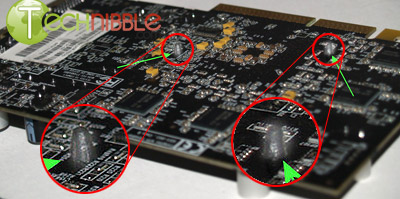
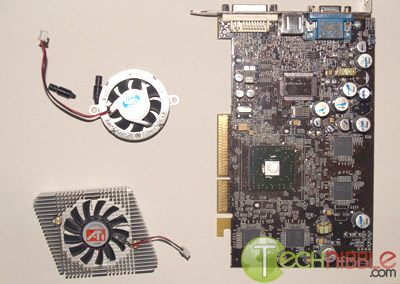
First off, the card was removed from its slot, whether it’s AGP or PCI-Express. The first thing you have to note is how the fan is connected to the card itself and how it’s powered. Since this is a standard ATi card, the heatsink has the holes in the same spot as it would on all 9×00 and Xx00 cards. Likewise, the power cable that feeds the fan was a standard, two-pin microconnector. The fan was removed from its place by pinching the two plastic nipples on the underside of the card with a pair of tweezers, then slowly rotating them until each popped out. The fan was then simply lifted off the card, along with a layer of old thermal paste.
Session expired
Please log in again. The login page will open in a new tab. After logging in you can close it and return to this page.
After searching fruitlessly for a replacement fan, or entire chip cooling assembly, for a BFG NVIDIA GeForce 5600 256MB AGP card, I decided to rebuild the cooler. The OEM fan was a Sunon KD1204PFB1 12VDC/1.4W 40mm sleeve bearing unit that had been snipped out of its rectangular duct frame and glued to a clear plastic 3-tab mounting spider. I salvaged the spider and similarly cannibalized a Sunon KDE1204PFVX 12VDC/1.9W 9.5CFM, 40x40x10mm MagLev bearing fan by cutting the three motor support struts, mounting it on the spider with hot melt glue and connecting the wires to a Molex 4-pin disk drive connector tap, just like the OEM fan had been. Works great, and the MagLev bearings will never wear out! I happened to have the fan already in hand, but other than that, the total time to repair was less than two hours. The fan was ordered from Jameco Electronics, Belmont, California, about $7+S/H and sales tax. The advantage to this approach is that I never had to remove the aluminum heat sink from the chip and mess with thermal transfer grease at all.
lol just found this somehow off Google…..
who would have thunk we would go from moaning tiny hetsinks aren’t quite good enough to the massive 4870X2 heatsinks kicking about these days….
I have problems with my video card fan too (I have to punch the computer over and over to slowdown the damn thing… it’s driving me mad).
What I’d like to know is why the heck this happens to so many people? They work hard making new, high-performance computers and yet they can’t make something as simple as a fan work right. This is fucking pathetic!
sanjuro, no need to get uncouth. Re-read by comment above yours. The solution is to use a fan with a non-contact bearing, such as the Sunon MagLev series. They cost a few pennies more than the sleeve bearing fans Taiwanese and Chinese OEMs use, and that’s why the OEMs don’t use the better ones: They’re cheapskates.
Whenever I hear a fan bearing start to rattle and growl, I get out my Mouser, Jameco or Digi-Key parts catalog and order a better-than-OEM replacement. The replacement fan will never again bother me and will last longer than I care to keep the equipment. End of story.
Hey does anybody know where to get replacement plastic “video card nipples” shown above? I would be forever grateful. thx.
[…] found this tutorial on the subject from a guy that actually went through the process of replacing a GPU fan on an ATI […]
[…] found this tutorial on the subject from a guy that actually went through the process of replacing a GPU fan on an ATI […]