How to install Laptop RAM
This guide has been created to instruct readers (both technicians and consumers alike) the proper procedures of installing laptop memory. It includes a step-by-step illustrated guide on the physical steps required for installing laptop RAM.
First of all, not all laptops have this type of access to the RAM slots and if yours does not you will probably need an authorized laptop repair technician to do it for you.
Before you start removing the panels to get access to the RAM slots, read the manual. If your laptop didn’t come with a manual or you cannot find it, your laptop manufacturer’s website should have one available for download in PDF format.
The manual should specify the maximum memory capacity of the laptop and you can also see how much RAM is currently installed by going to the Windows System Information (as mentioned in the last picture in this guide).
Once you determine that your laptop will be able to handle a memory upgrade and you have purchased the parts, you are ready to start.
Turn off the computer and remove all cords from the system AND the battery. The battery can still hold charge which can surge your hardware.
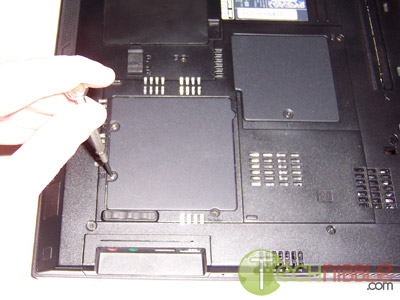
Turn the computer upside down and locate the panel which allows you to access the RAM modules, for the laptop below the panel had a picture of a little ‘computer chip’ to indicate the memory panel.
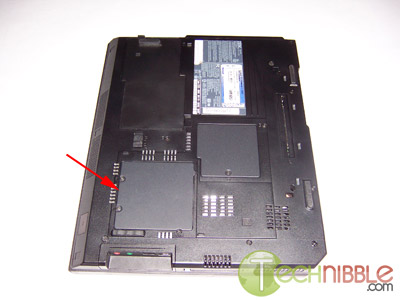
Locating the memory panel

Unscrewing the memory panel

Lifting the memory panel
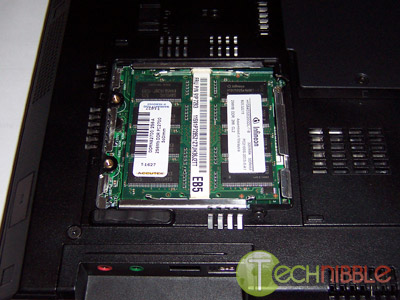
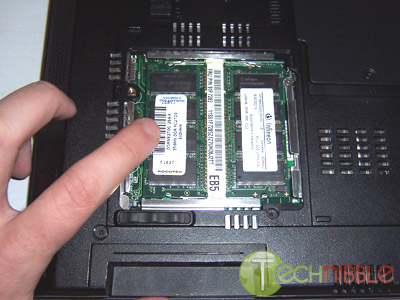
Looking inside the laptop
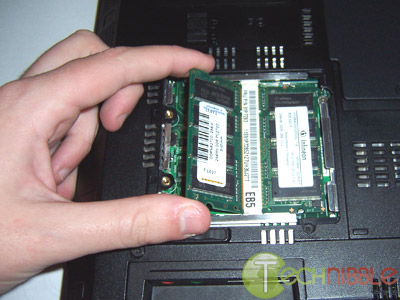
If you are upgrading or replacing an existing memory module, remove the current one by pressing the clips on the side of the RAM outwards and slide it out on a 45 degree angle.
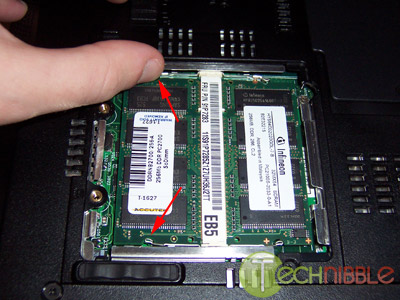
Unclipping the memory module

Sliding it out
When installing a new RAM module, align the notch of the memory module to the notch on the laptop slide the RAM into the slot on a 45 degree angle. You may need to push hard as it can take 20 – 30 pounds of pressure to install.
Installing a new memory module
Pushing the memory module into place
Closing the laptop back upWhen the memory panel is secured, flip the computer back up the right way, plug in the power cord and boot it up. If your computer does not boot, look at the troubleshooting section at the end of this guide.
If the laptop does boot up correctly we need to test if the installation was successful. Go to “System Properties” by right clicking on “My Computer” and choosing “Properties”. On the “General” tab, it will specify how much RAM is installed. For this laptop, it currently has 512 MB of RAM and it previously had only 256 MB, so this RAM installation was a success.
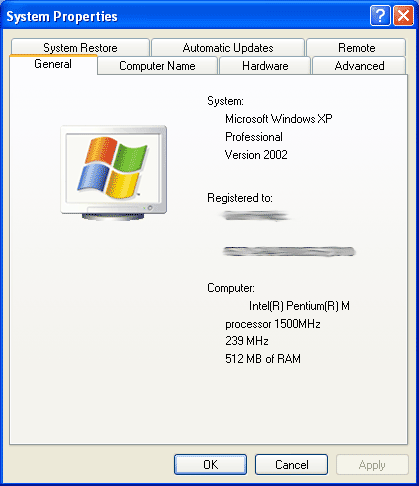
Checking the System Properties
Troubleshooting:
If your system does not start, check the following:
If you receive an error message or a series of beeps then your laptop may not have recognized the new memory. Remove and reinstall the RAM to make sure that they are securely inserted into the slots.
If you get a memory mismatch error, follow the prompts and enter your computers setup. Then select Save and Exit. This isn’t always an error, a lot of laptops require this to install new RAM.
When you start the laptop you may get a message prompting you to update your configuration settings, refer to your laptops manual for more information.
Session expired
Please log in again. The login page will open in a new tab. After logging in you can close it and return to this page.
hi, where can i find the actually memory and which memory is important? and what is a virtual memory??
You can purchase laptop RAM at most computer stores. Both Harddrive space “memory” and RAM are important. But personally I find RAM to be more important due to the fact it effects how the computer runs. More RAM, faster computer. As for virtual memory we have an article here:
https://www.technibble.com/virtual-memory/
Well do you have to buy a certain ram card for a certain computer or can you buy any brand?
Ram BRAND doesnt matter. However, you must have the correct TYPE of ram for your laptop. Check out http://www.belarc.com which will tell you what your laptop can handle.
I have a Sony Vaio PCG-XG9 laptop w/ 64 RAM. How do I install or upgrade the rams. I tried removing the back cover plates but couldn’t see the memory banks or even have access to it.
HELP!
Your best bet would be asking this on the technibble forums: https://www.technibble.com/forums/
WHAT TYPE OF RAM DO I USE FOR ACER 5101 SERIES?
if I have two slots for ram, i need two of the same size ram modules, right? example: I can’t have a 512 next to a 1GB. Or did I just imagine that?
I bought a Microslate ruggerised laptop 2 years ago (big mistake). I tried to install 1 GB RAM card. Once install, nothing work. I removed the card and everything works like a charm. I guess that 1 GB is too much. I currently have 256 MB and just idling, I run at 300 MB. How can I figure the max RAM I can install? There is no manual and Microslate (the maker) closed dwon in 2006.
“RE: if I have two slots for ram, i need two of the same size ram modules, right? example: I can’t have a 512 next to a 1GB. Or did I just imagine that?”
Well if it’s the same with desktops, then NO. You can have ram modules of different sizes. But make sure the SPEED numbers are the SAME. Company brand names don’t need to be the same, but if you want more than a 4/7 probability that your motherboard correct coordinates 2 modules with differing speeds, then MAKE SURE THAT THE SPEED NUMBERS ARE SAME.
RE: “I bought a Microslate ruggerised laptop 2 years ago (big mistake). I tried to install 1 GB RAM card. Once install, nothing work. I removed the card and everything works like a charm. I guess that 1 GB is too much. I currently have 256 MB and just idling, I run at 300 MB. How can I figure the max RAM I can install? There is no manual and Microslate (the maker) closed dwon in 2006.”
Ummm…windows XP is configured to be able to read and utilize 4 gigs of ram. Vista should be more.
Acer 5100 Notebook
How do I access the Memory modules on this notebook. Says remove panel at back where memory is situated. Have removed the screws but panel will not come off – new notebook so I do not want to damage.
Thanks.
Re accessing memory modules in Acer 5100 series: After removing the screws in the memory’s cover plate, gently pry the plate out. It has little tabs on its underside and you need to push the plate to one side while gently prying under it. It will eventually pop out. Replacing the cover plate is a bit tricky, too. Good luck.
I installed RAM on my Toshiba Satellite M35 (Two sticks 1GB each) and when I tried to boot up, it seemed to freeze. It says press F2 for Setup or F12 for boot device selection menu, but neither work. Any ideas?
This is very interesting, i had no idea it can be that simple. Having a laptop, made me understand that i can do many things much more easier, i wouldn’t give up my laptop that easy, i have come to be dependent on it. This review solved some of my problems, before i used to need help because i had never managed the technical part and always bumped into troubles.
Acer Aspire 3003WLC
I Was Wondering What The Max RAM I Can Use With This Laptop.
Thanks
hi i recently installed 1gb of ram into my toshiba satellite a135 laptop. it already had 512mb so i hjust added the 1gb in the 2nd memory slot.
now when i go to my computer properties it says i only have 894mb of ram. it def runs faster but im wondering if maybe the card i got wasnt realy a whole gig (i got in on ebay so who knows) but it would have had to be a 382 mb card…and they dont even make those..do they?
help!
fafa, Chances are that the onboard video card of your laptop is using up 128mb of RAM. In the BIOs of your laptop you can change this to something lower like 32mb or 64mb depending on what the laptop is used for.
This 894mb of ram behavior is normal.
[…] HT was the winner, and I picked up the RAM on Saturday morning. I’ve never played inside a laptop before, so again I looked online for reassurance. I found my saviour: https://www.technibble.com/how-to-install-laptop-ram/ […]
Hello,
I want to order some goods from your company to ship to continental
US by FEDEX or UPS courier service next days air delivery.
1GB DDR SODIMM PC2700 333MHZ 200-Pin Memory Laptop .
I will make the payment of the order by credit card kindly get back
to me. Awaiting for your urgent reply.
Best Regard
Does anybody know how to install ram with an acer aspire 1640z laptop?
[…] and find the answer. it’s different on most laptops. it might look something like this though:
Great article, followed your instructions and installation of the RAM in an Acer laptop went very smoothly as was done in under 5 minutes!
Thanks!
Hi, I have an Acer Travelmate 732TLV thats currently running XP it had 128MB of RAM in it and I added a second 256MB card to it, but when I start Up the disks start but the screen remains blank and nothing happens. In the reverse when I remove the new Stick it runs as if nothing had changed, HELP!!! thanks….
So after I have installed the RAM… what do I do if the amount of RAM doesn’t change? I had 512 and upgraded to 1 gig… and the general tab says 256?
Hi, can anyone tell me how much rams usually cost for a Toshiba laptop?
My brother said I might mess up my laptop trying to do it. Help anyone?
I just upgraded my ram on my laptop from 2gb to 4gb. However when i check the properties it says that theres only 3gb of ram though i have 2 2gb sticks of ram in there. what’s wrong with the ram and how do i fix it?
Jo,
Windows XP doesnt support any more than 3gb of RAM. You can HAVE 4gb but XP will only use 3gb of it.
[…] business. We offer free PC support where you can get technical advice immediately. We also offer …https://www.technibble.com/how-to-install-laptop-ram/Saving for survival – Stuff.co.nzIt can get a bit heated if there&39s competition for one piece, or […]
Hi,
I have a unusual problem
here it goes.
I bought a New 1GB RAM for my laptop (config below).
From Transend 1GB DDR2 667 SO-DIMM
I have 1GB RAM already on my laptop and I wanted to add a addtional 1GB RAM to this.
Now my problem is its not detecting. (BIOS says 1GB no matter what).
I replaced the OLD RAM with the new one to check if the RAM is working but this working fine.
Now I figured tht the second SO-DIMM slot is either disabled on not working.
1. If it is Disabled how can I enable it ?
2. If its not working then what should I do ?
HELP
Hi, I have a slightly older gateway that has 512MB DDR ram. I am looking at upgrading to 2GB DDR2 but wanted to know if the slot sizes are the same for DDR and DDR2 or if there are compatibility issues between the ram types. Thanks
I just attempted to replace my memory modules with two Patriot PC2700 333 Mhz. 200 Pin 1 GB DDR SoDimms. When I attempted to turn on the laptop the light went on but nobody was home. As far as I can tell these are the appropriate modules. When I went into the bios setup I could find nothing that could cause a conflict with RAM. What could be the problem?
Hello I have an acer 5100 media edition and my uncle had added more RAM’s on to the laptop but a couple of months with the larger ram’s I had to reboot my whole system back to it’s orginal state. how can I find out if it is installed properly and actaually working, because it’s running slower then when he added the rams before.
I am trying to upgrade the memory in my Dell Inspiron 4000 laptop by adding two 256 MB for a total of 512. After checking the specs and verifying with Dell customer support that the following memory would work, this is what I bought:
Two Single 256MB PC100 144PIN SODIMM SDRAM for Laptops / Notebooks
Chip Configuration: 32X64 High Density
Unbuffered, Non Ecc, Non Registered
High Speed
144 Gold-Plated Pins DDR2 SODIMM
I installed the memory per the instructions but cannot get the laptop to work. After inserting the new memory, the machine will not boot up at all — it briefly flickers but will not boot. I tried switching the memory around but get the same results. When I put the old memory back in, it boots up fine.
Any suggestions?
RE: “I bought a Microslate ruggerised laptop 2 years ago (big mistake). I tried to install 1 GB RAM card. Once install, nothing work. I removed the card and everything works like a charm. I guess that 1 GB is too much. I currently have 256 MB and just idling, I run at 300 MB. How can I figure the max RAM I can install? There is no manual and Microslate (the maker) closed dwon in 2006.”
go to crucial.com and download ther scanner thingy
This is actually in response to a response several entries ago. The Toshiba Satellite A135 upgraded from 512 MB that now has 894MB showing, this is not normal behavior, the memory isn’t going to the video card. If the user had gone looking before upgrading, he would have noticed that the machine was only registering 477MB of his 512MB card. I am having the same 894MB issue after having installed 2GB on the machine (it is only seeing 477MB per slot).
heres a question … i recently attempted to change the ram in my everex stepnote va4300m. after opening the plastic backing i noticed a silver casing around the ram.this was not in any of the video’s i had previously watched when learning how to remove ram(the person in the video just took off the laptop backing and the ram was just sitting there waiting to be removed). the material is like tin-foil but only a lot stronger. after gently pulling up on it, only to see that it wasn’t budging, i decided to look for a little advice before i went any further.i’m sure that the tin-foil material is only to protect it, but i’m not sure if it is meant to be removed together with the ram, as a solid unit, or if it is meant to be torn off before begining the project.
thanks for listening.
Response to Richard J –
The problem you are experiencing with your Dell Inspiron 4000 memory upgrade is that you installed high density memory. The Dell Inspiron 4000, and many older laptops, require low density memory. Low density memory for these older laptops is getting hard to find. You can certainly find them at crucial.com for approximately $40-$50 per 256MB module. From time to time you can find them on eBay for much less, but caveat emptor. Many sellers misidentify their memory as low density when, in fact, it is high density. Good luck.
I upgraded the RAM in my Toshiba M5-4332 laptop (original RAM PC2-4200 DDR2 533MHz SDRAM) with 1 GB x 2. The screen is totally blank and although the lights come on, the screen in black and runs super quiet. I put the original RAM back into it, and now it still doesn’t work. I could sure use some help. The laptop worked PERFECTLY -except it was a little slow, hence the added RAM. It checked – it is seated properly and clicks into place. I did not touch anything while putting it in. How can I get my laptop to work again?
How do I add more ram in my vaio notebook model PCG-5G3L.
Guys, go to http://www.crucial.com and download and run the system scanner. It will bring up a report which tells you everything you need to know (ie. compatible ram, maximum # of GB your PC can handle, etc etc).
btw your laptop does have normal restrictions for how much ram can be in a single slot use this web site to see of yours has restrictions:
http://www.crucial.com/store/drammemory.aspx
at the top it says crucial memory advisor tool
I have an acer 5100 and it has 1GB of RAM in it and I want to have 4GB RAM in it. So what are the steps to doing it, like installing in onto the computer. I already know how to open the laptop and put it inside