- You are here:
- Home »
- Blog »
- Starting A Computer Repair Business »
- How To Brand Windows
How To Brand Windows
I have mentioned a lot about branding in the last couple of weeks including talking about your corporate image. Well, the new computers that you roll out should be no different. In this article, we’ll show you how to brand Windows with your own logos and information.
There are a few places you can brand the operating system. The System Properties, Internet Explorer and the background. I don’t recommend you change the background as it may annoy some people.
As for the System Properties and Internet Explorer, here is how to brand them:
How to brand the “System Properties” dialog
If you right click on “My Computer” and goto Properties. You will see the following dialog:
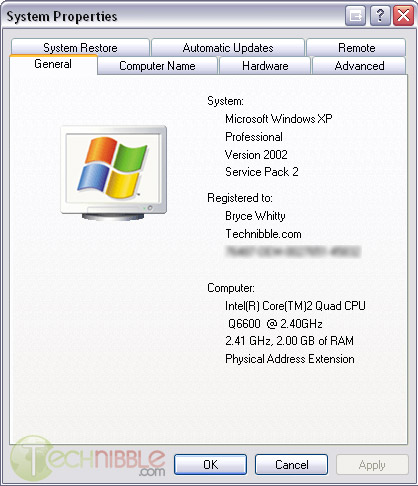
For those of you who are using a brand name computer, you may see the manufacturers logo in this area.
If you are a system builder, this is a great opportunity to place your own logo for some free branding and it may bring in some extra work down the track if they need assistance.
To place your own logo here, you should create your image as a .bmp file. It is also a good idea to create your logo with the same background color of grey as the system properties dialog (which is RGB: 192, 192, 192).
For your convenience, I have also created a blank downloadable sample here (right click > save as). The maximum sized image allowed is 180w x 120h pixels, anything smaller will be resized to this size.
Once you have created your logo, save it as a .bmp file and name it oemlogo.bmp. Then, copy it to your system32 subfolder in Windows (usually c:\windows\system32). Next time you open your System Properties dialog you will see your logo there.
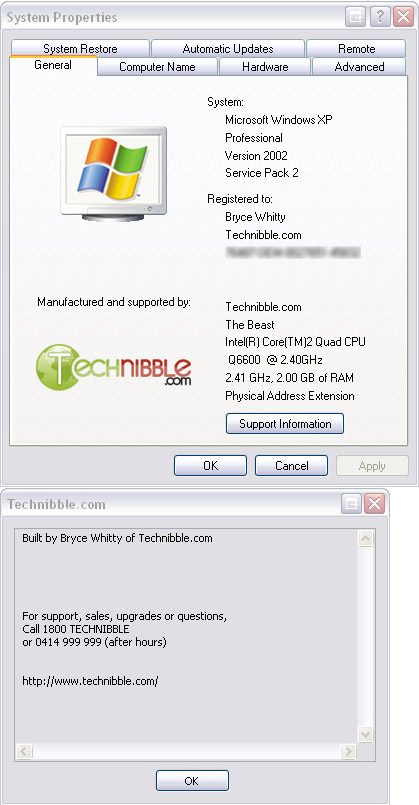
You can also show a “Support Information” button that will popup with any text you like (a business name and support phone number is a good idea). To create this, download this sample ini file (right click > save as), edit it with your own text and save it to the system32 folder.
If you have done everything correctly you should see something like this:
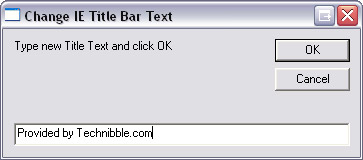
Internet Explorer Title Bar
Another opportunity for branding is in the Internet Explorer Title Bar that appears after the website title. Many ISPs will use this area to add something like “Provided by ISP Name”.
To change this, Doug Knox has created a great little Visual Basic script that allows us to change it with ease. Just download this file (right click > save as) and run it. It will first ask you if you want to reset Internet Explorers title to the default. If you choose no it will give you the option to change it. Once you have written something in the text field, click OK to save the changes.
Note: I recommend that you restrict your branding to new systems only as it may annoy some people who have pre-existing computers.
Session expired
Please log in again. The login page will open in a new tab. After logging in you can close it and return to this page.
Might I also suggest Autopatcher and nlite? Two amazing tools that I use to speed-up the repairs. When asked why I charge so much for a small amount of time, I state that the tools used require a considerable amount of preperation time.
Great idea, I’ve always wondered about those system window logos, I’ll use this in the future!
Bryce,
Nice writeup. I’m glad you included the note about not doing this to existing systems. I’ll be adding this to my toolbox. Thanks.
Great info here. Thanks for this!
I have been using this branding technique for a couple of years now. Saves a lot of time if you use WinRar to create a self-extracting file to place the oeminfo and oemlogo into the system32 folder.
Hmm, this is interesting… I haven’t seen this before, but I have no need to use it… just a cool feature for corporations. If I had a large company and employees I would be sure to use it.
Nice tip, thanks!
It may be worth noting that I needed to have a populated oeminfo.ini file in order to display the logo e.g. no oeminfo.ini = no logo.
And the colour of the backround is RGB: 250,250,250 (at least for me)
Great post, Is there anyway of changing the Windows Start up Screen – The one with the bar pinging from right to left?
just another thought… thanks for the template (.bmp) but I would recommend using GIMP or some other graphic editing software and creating a transparency of the logo, that way, playing with the palette to figure out what ‘gray’ to use or adding another layer of color to the logo options, would not be an issue.
For instance, I took your oemlogo.bmp file, pulled up our logo in GIMP and shrunk it down (scale image) until the file size was the same or smaller, and then I selected the ‘transparency’ option and copied it to the win/sys32 folder and it embedded perfectly…
just another idea….
Thanks for the tip Bryce. What I would like to know for when I’m building machines, how can I make the manufacturer splash screen, like the Dell/HP/Gateway ones?
Normally would agree with the business card Mike, but it’s been my experience the EU always loses a card. And/Or they can’t remember the name of the place they bought it from. So having it right on the machine is great. Would even think about putting the “warranty ends” period on there.
I agree that the background should simply be transparent. The grey did not match my computer’s settings either.
Otherwise, this is brilliant. Nicely done.
If you build systems and opt to bundle Firefox (honestly, I wouldn’t expect to get a browser as bad as IE from a private vendor), you could include the https://addons.mozilla.org/en-US/firefox/addon/57 Title Bar Tweaks extension. Users would be able to easily disable it if they wished (who honestly wants their title bar configured), but it may make a professional first impression?
Good tips.
Careful about blurring rather than blanking out sensitive info though. Algorithms are clever these days :)
To those wishing to change the windows startup screen: This requires modifying system files; it can be done, however, not easily and it is not recommended as you can screw up your system.
To those wishing to change the computer’s startup screen: That’s the BIOS. Don’t even try to change that logo. I don’t know if it can be done. I don’t think that you should try to do it. Kill the BIOS and you need a whole new motherboard.
Wow! Very good information I always wondered how companies did that–and I didn’t realize it was that simple.
I wish there was a way; however, to completely brand Windows in the way that many Linux distributions are branded with their specific company’s logos, etc.
@bill webber.
Slightly on the paranoid side there Bill, I don’t care what super computer or grid computing system you try it on, no computer will read the blurred text it’s an impossibility.
I always put my phone number with any marketing/advertising, so consider putting your phone number on IE browser title bar as well.
Nice tip, but how can one put this in a CD so when you install it you will automatically get the logo.
If you want to modify the startup screen a program like Tuneup Utilities will do the trick
Does it works on Vista?
Very useful, but will the script work in firefox or netscape?
My farts stink.
What a neat little trick
PS – Mary Poppin Caps: thanks for sharing
Really nice trick
thanks
Neat thing to do, provided it isn’t too annoying to the über techy folks. Question though…is this only applicable to Win XP or can it be done in a Vista environment as well?
@gCommerce:
I tried the support info in Vista, and it does not work.
Really neat! I will put this on all the computers that I sell.
While on the subject of branding, how do you substitute your own startup screen for the manufacturers?
I went a step further. I created a folder with the logo and ini file then made a batch file, so in the event someone didn’t want it, I could return the information because I backed (bak) it up.
Create a text file and rename it to brand.bat
right clic>Edit the file and enter the following information in;
rename c:\windows\system32\oemlogo.bmp oemlogo.bak
rename c:\windows\system32\oeminfo.ini oeminfo.bak
xcopy /Y oemlogo.bmp c:\windows\system32\
xcopy /Y oeminfo.ini c:\windows\system32\
do no copy below this line
I’m also diggin around to brand the start menu.
I liked this. I tried to brand my computer but it is not working. However IE is working. will you pl advise and guide me how this logo could be branded on my computer.
thanks
Hi , my name is Rodolfo and I are very happy with your e mail in my in box , bat I tried to brand my computer with a logo the i find online and i rename it oemlogo.bmp and it is not working , when i open my computer in properties i dont see my logo , please can you help me . thank you .
Raghavendra & Rodolfo, you need to make sure you put the ini file in there as well
hey my name is jason and can any one help me i have windows 7 Can i cange the logo in windows 7 becouse i want to put an alienware logo
Please HELP ME I HAVE WINDOWS 7 MY email : jayfdes@gmail.com